The headless architecture of Contentstack allows it to integrate with SendGrid. In this guide, we will discuss the steps required to integrate Contentstack with SendGrid for effective email management.
Set up and Configure the SendGrid Account
The first step is to create an account in SendGrid. Follow the steps given below to set up your account:
- Sign up with SendGrid and select one of the plans depending upon your requirement. For this exercise, the Free Email API plan should suffice, but you can choose their paid plans to get access to more SendGrid functionalities.
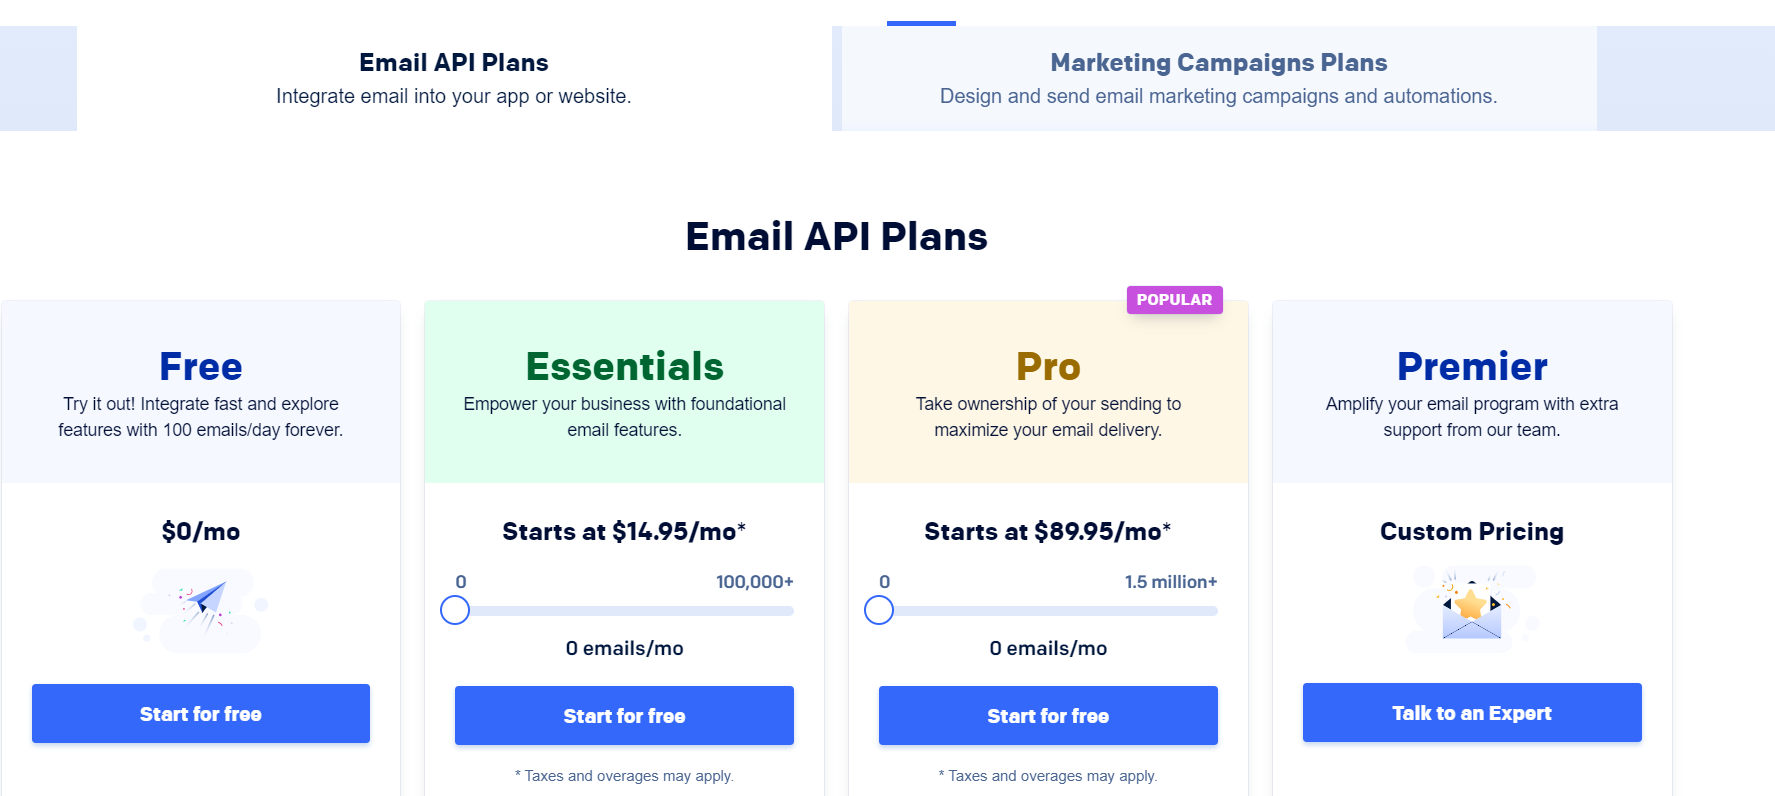
- Once you click on Start for free under the Free plan, you will be directed to the Let's Get Started page. Provide an email address, a password, and click on Create Account after agreeing to the terms and conditions.
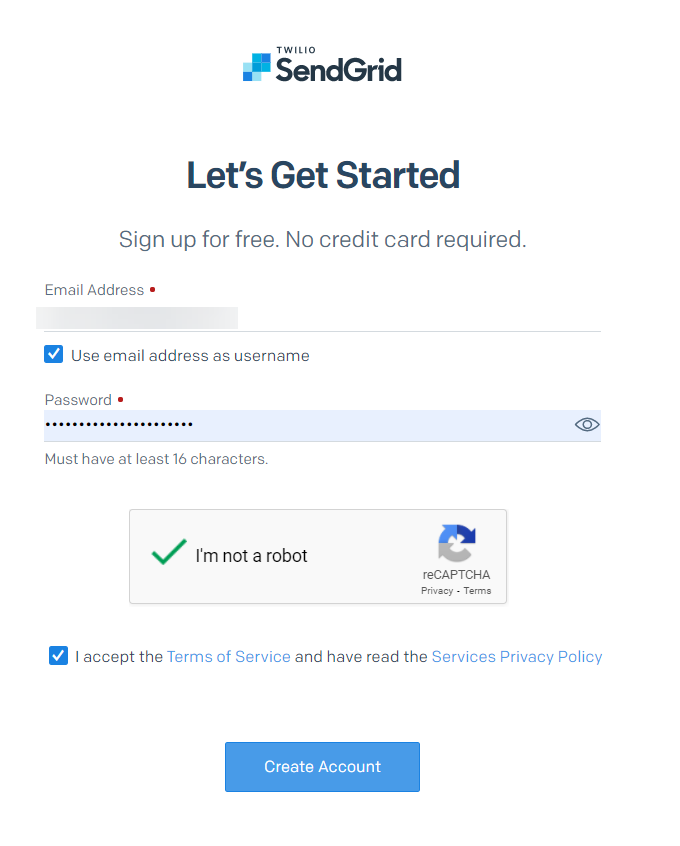
- Follow the onscreen instructions on the next screens and get your account created.
-
Once your account is created, add and configure the verified sender steps as mentioned in the Single Sender Verification guide.
Note: Before performing any task within SendGrid, such as sending emails or using any of their API endpoints, it is essential to add a sender identity/verification. Once verified, you can perform the required operations (minimum 1 verified sender is required).
-
Once you are logged in to your SendGrid dashboard, navigate to Settings dropdown from the left navigation panel, select API Keys, and then click on Create API Key.
-
On the Create API Key page, provide a name to your API key and inside the API Key Permissions section, select Full Access. Then, click on Create & View.
-
Ensure you copy your API key and note it somewhere as you will require it later while setting up the lambda function. Once you have copied the API Key, click on Done.
Note: It is essential that you copy and save the API key somewhere as you will not be able to view it later due to security reasons as mentioned by SendGrid.
-
Next, we need to add a list of contacts in your SendGrid account. To do that, navigate to the Marketing dropdown and select Contacts as shown below:
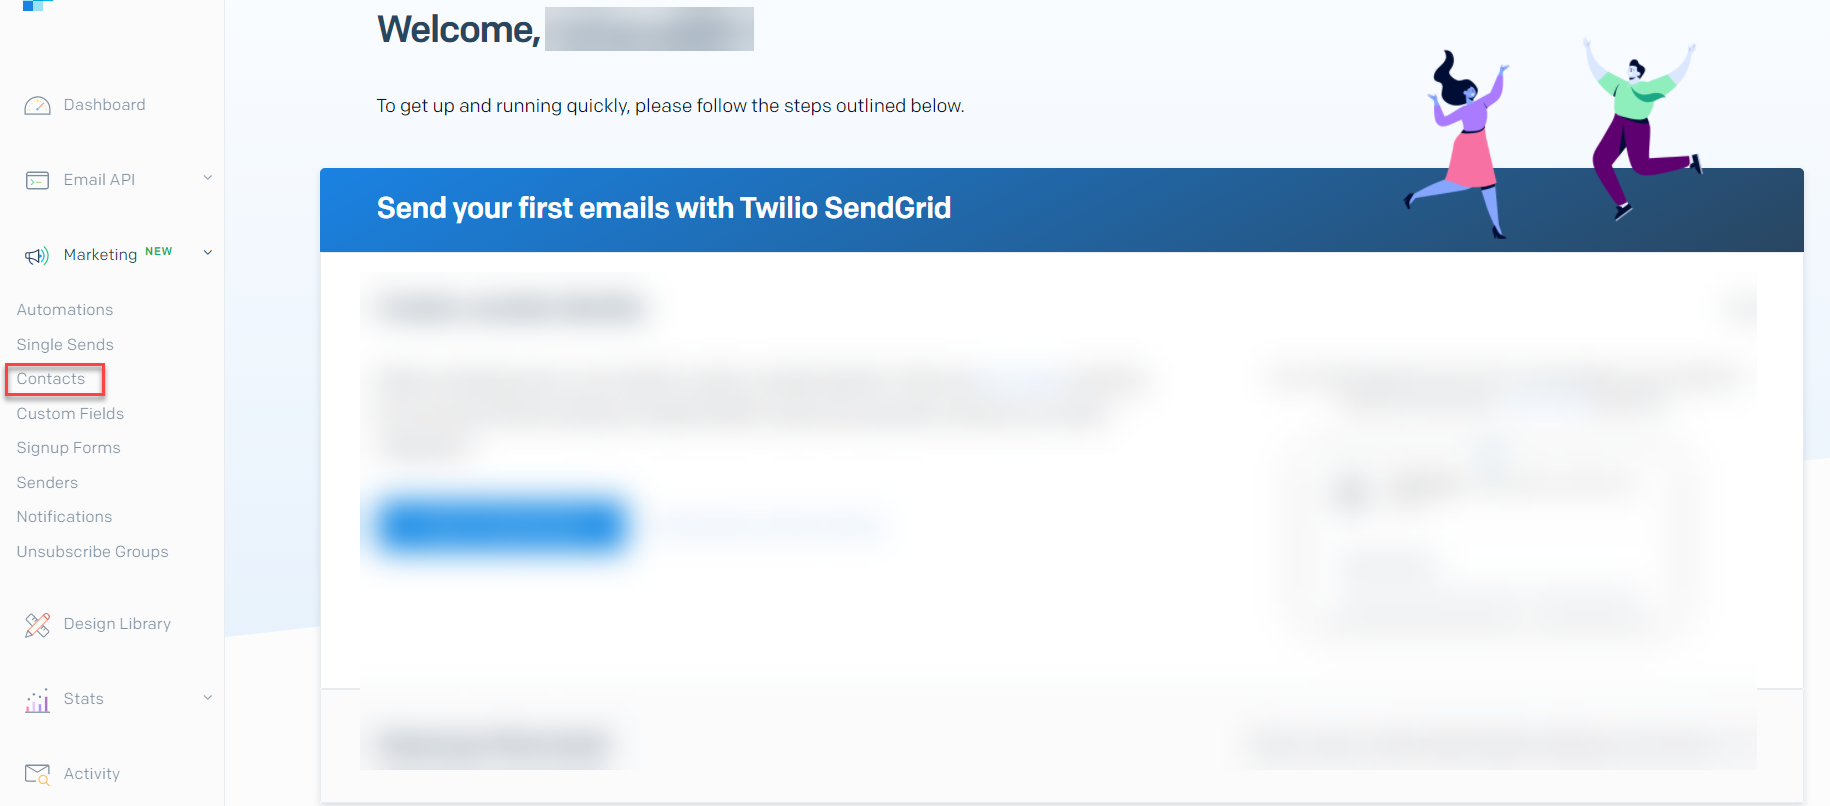
- On the Contact Lists page, you can add the contacts who will be part of your email marketing campaign. You can create a contact list manually or you can upload a list of contacts in a CSV file.
The supported CSV format is discussed in detail in the Formatting a CSV article. To do this, click either on Create and select New List, or click on Add Contacts and select Upload CSV or Manual Add. Refer to the Segmenting your contacts article for more details. -
Lastly, we need to add an unsubscribe group to let users to unsubscribe from the emails that you send. To do this, navigate to the Unsubscribe Groups option on the left navigation panel.
-
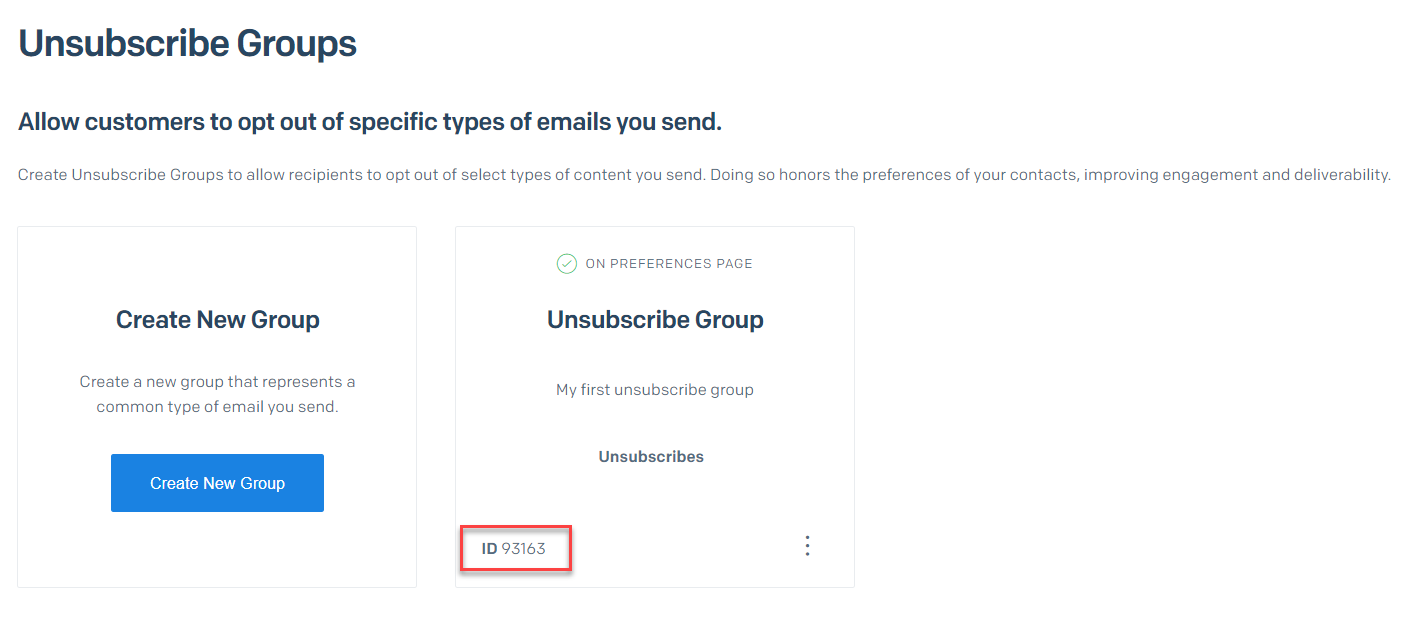
On the Unsubscribe Groups page, click on the Create an Unsubscribe Group button. Provide a suitable name and description. Once done, click on Save Unsubscribe Group.
A group ID will be generated as shown below. Make note of it as we will require it while setting up the lambda function.
With this, we have completed the setup of SendGrid and configured it as required. Let's now move into Contentstack and set up the required essentials.
Download the Example Folder
We have created a sample code to help you integrate Contentstack with SendGrid. Download the code from our GitHub repository.
The downloaded folder will be a zip containing the following folders:
- extensions: We will be creating two extensions (custom fields) for this exercise. It contains subfolders named Recipient Extension and Sender Extension that have the required code for the custom fields.
- content-type: This folder contains the schema of the content type in JSON which you will have to import to your stack. Once the schema is imported, you will have to edit it and add 2 custom fields in it.
- lambda-functions: This folder contains codes required for setting up two lambda functions. The first function will help us deliver the content to the SendGrid and change the workflow stage to review. The second lambda function will help us complete the process by changing the workflow stage to complete.
Let's proceed with creating extensions for our example.
Create Extensions in Contentstack
We will now create the following two extensions (custom fields) in Contentstack:
- Sender (From) field. This will be used to fetch the list of verified senders from your SendGrid account. Note that this field will take only 1 verified sender at a time from the list of verified senders.
-
Recipient (Send to) field: This will be used to fetch a list of contacts in your entry & you can select those lists in the field itself.
To create the Sender custom field extension, log in to y0ur Contentstack account and perform the following steps:
-
Go to your stack, click the “Settings” icon on the left navigation panel, and select Extensions (or click “alt + X” for Windows, and “option + X” for Mac).
-
On the Extensions page, click on the + New Extension button, and select Create new as shown below:
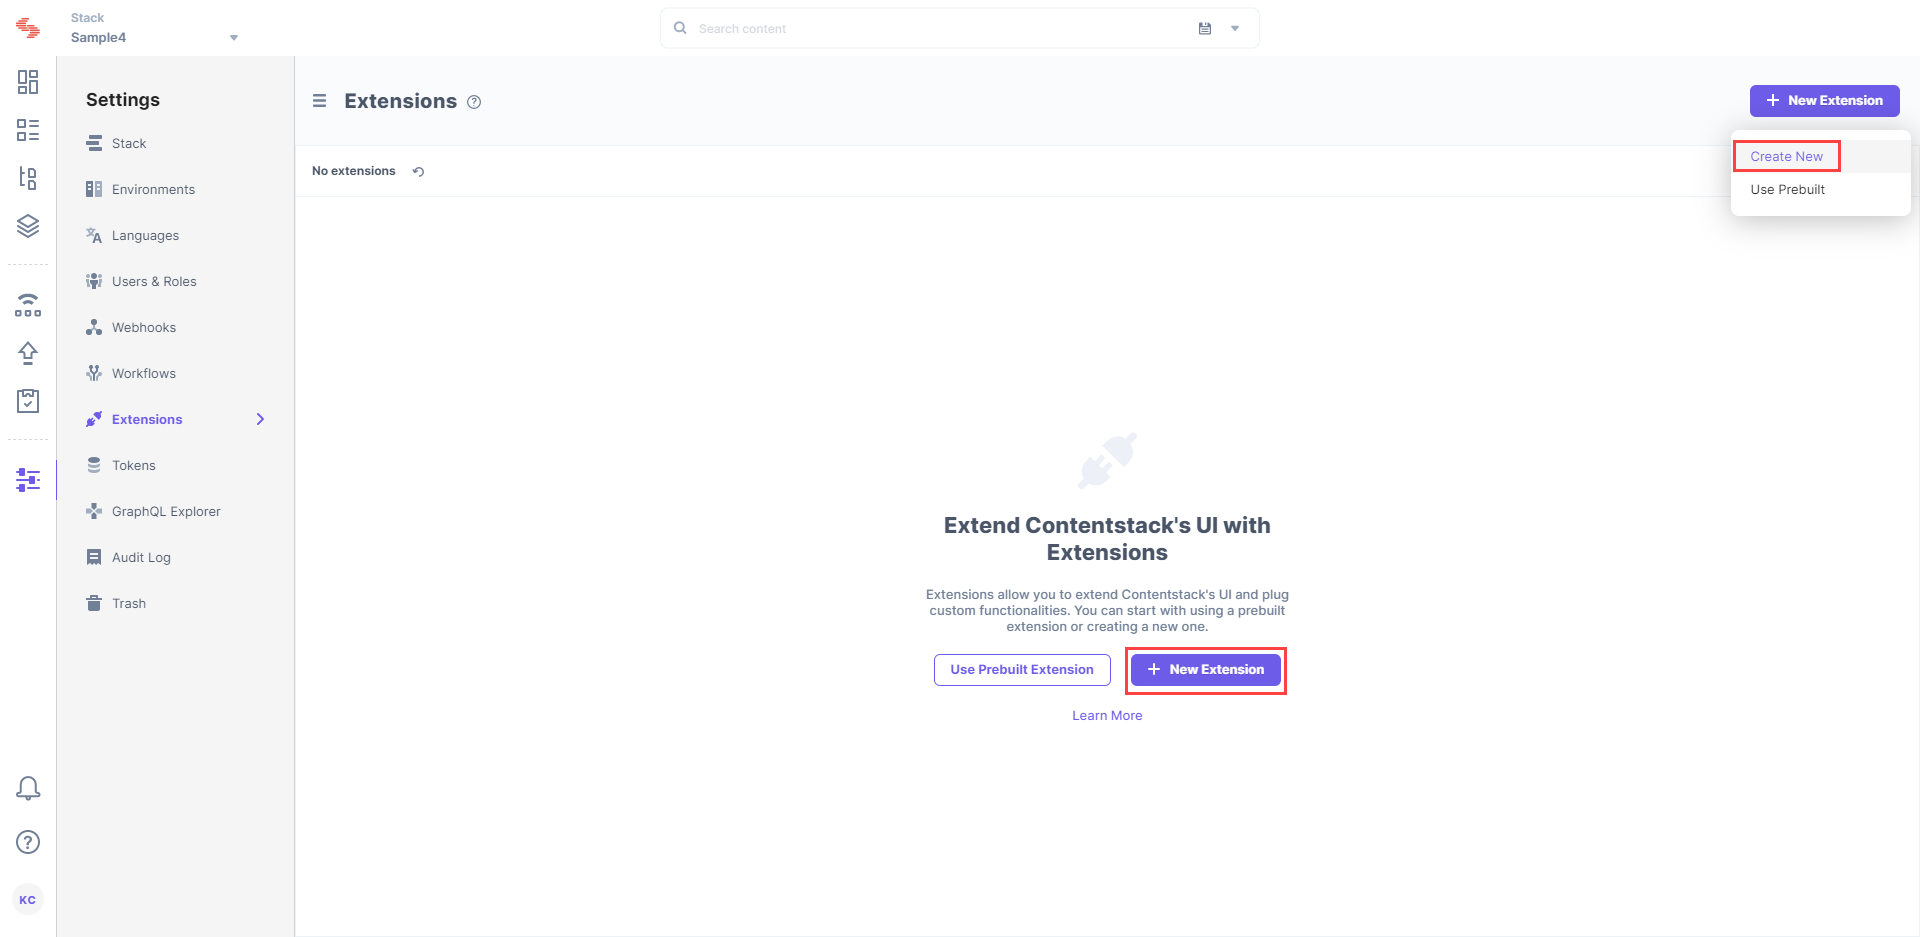
- In the Select Extension Type window, select Custom Field.
-
On the Create New Extension page, enter values in the fields as given below:
- Title (required): Provide a suitable title for your custom field, for example Sender. This title will be visible when you select the extension in the custom field in your content type.
-
Field data type (required): Select the data type in which the input data of the field should be saved in Contentstack. For this example, select JSON.
-
Multiple (optional): Select this if your custom field accepts multiple values, and the data type is not JSON. You can leave this option blank for this example.
-
Hosting method (required): Select Hosted by Contentstack. As soon as you do that, the External source code field becomes visible. Paste the code from the index.html file stored inside the SendGrid Share > extensions > sender extension folder.
-
Config Parameter: Provide the following config parameter for this extension.
{
  "apiKey": "Bearer {the SendGrid API key which we generated in the first step} ",
  "baseUrl": "https://api.sendgrid.com/"
}
Do not use the curly brackets as shown in the following example:

- Once you have done this, click on the Save button.
Your Sender custom field is now ready. Follow the same steps and create a Recipient custom field with the same settings. Copy the code from the SendGrid Share > extensions > recipient extension > index.html file and paste inside the Extension source code field of this extension. Use the same Config Parameters as shown in the above screenshot for this custom field as well.
Let's now move ahead and import the content type.
Import and Edit the Content Type
Before importing the content type, ensure that you have created an environment where you will publish the entries. For this exercise, we have created a “development” environment.
Once you have done that, proceed with importing the content type:
-
Click the Content Models icon and click the Import link.
-
Select the sendgrid.json file from the SendGrid Share > content-type folder and click on Import.
Once you have imported the content type, edit the content type to view its schema. It should look like this:
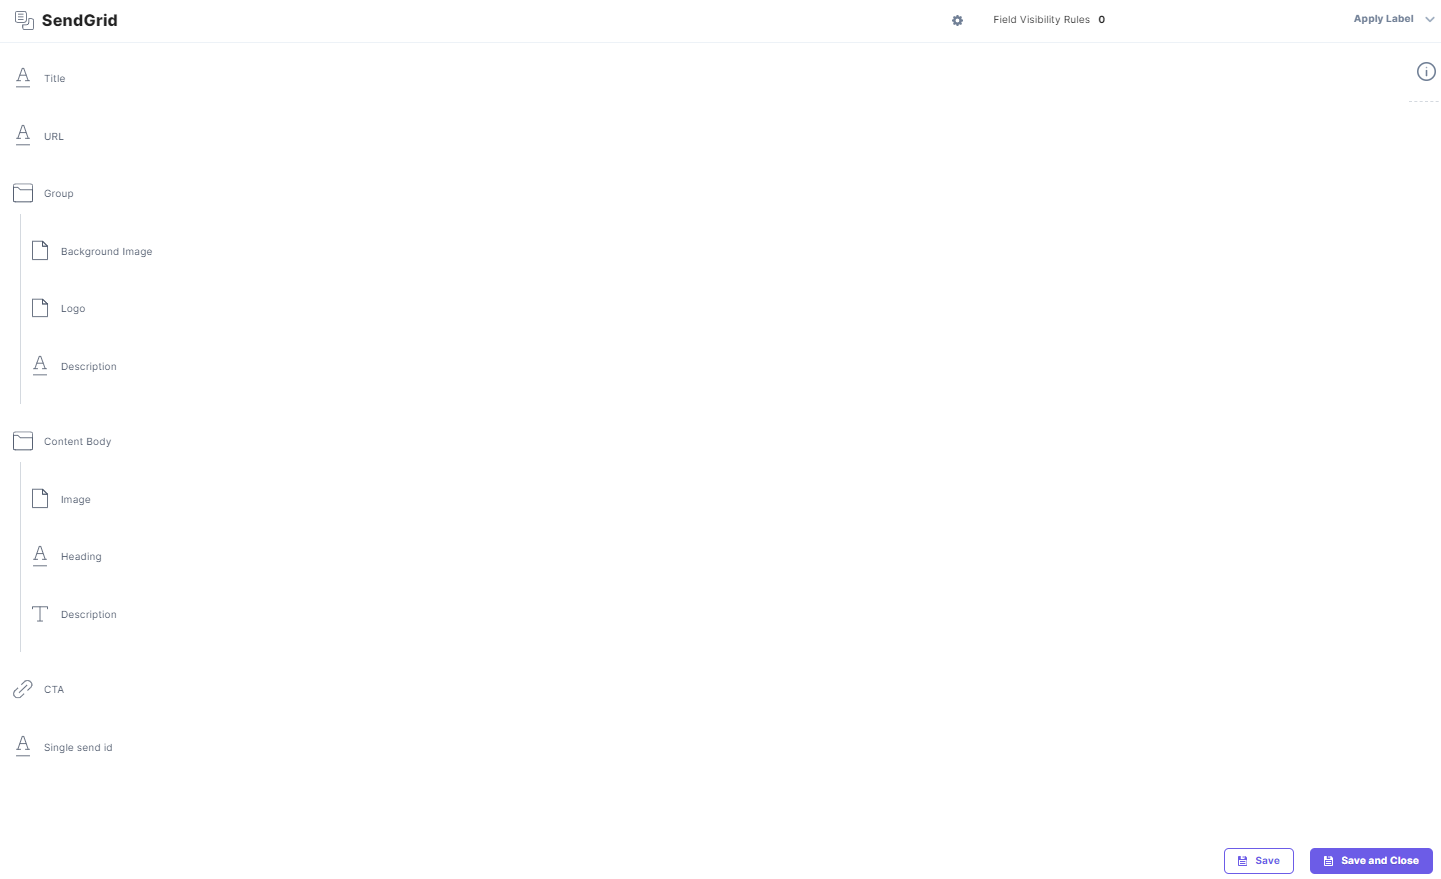
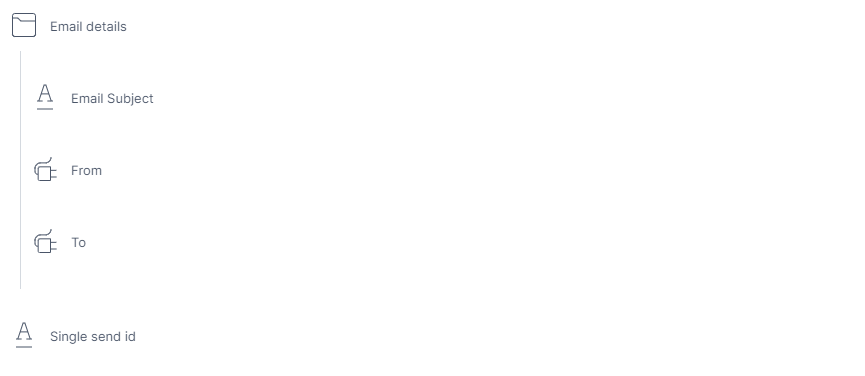
You will notice that there are a few group fields already added to the schema named Banner group and Content body. You need to add another “group” field and name it Email details just above the Single send Id field. Add the following fields in this group field:
- Single Line Textbox field: Name it as Email Subject.
-
Custom field: Name it From and select the Sender extension from the Select Extension dropdown from the right selection panel. On the entry page, it will show the list of verified senders from SendGrid and let you select only 1 sender at a time.
-
Custom field: Name it To and select Recipient extension from the Select Extension dropdown from the right selection panel. It will show the list of contacts from SendGrid to choose from.
This is how it will look once you have added these fields:
Save and Close the content type to save your settings.
Note: The Single send Id in the above screenshot is a “Single Line Textbox” field. It helps in saving the single-send-id created in SendGrid, that is, the template ID. While creating the entry in this content type, for the first time, the Single send Id will be empty. After the entry is published successfully, it will get updated automatically through an update call (added in our first lambda function) and save the single-send ID which is created in SendGrid.
Set up a Workflow in Contentstack
We will now set up a workflow that will help us maintain a systematic approach for reviewing and approving content. The editor will create the content for email in Contentstack and the reviewer will review it and send the email in SendGrid. This is where workflow helps us manage this process.
Follow the steps given below to set up the workflow:
-
Click the “Settings” icon on the left navigation panel, and click on Workflows (or click “alt + F” for Windows, and “option + F” for Mac).
-
On the Workflow Settings page, click on + New Workflow.
-
Provide a suitable name to your workflow and an optional description.
-
Under the Scope option, select if this workflow should be applied to All Content Types or Specific Content Type(s). For our example, we will select the Specific Content Types(s) option and then select our content type, SendGrid.
-
Inside the WORKFLOW STAGES option, add three stages (for example, Draft Email, Review Email Template, and Email Template Sent).
Additional resource: Learn more about workflow and its stages, refer to the set up workflows guide.
- Lastly, click on the Enable Workflow checkbox and then on the Save button.
-
Go back to the Workflow Settings page and note down the WORKFLOW ID that we just created.
Make note of the Workflow ID as we will need this while setting up our lambda function.
Now we need to assign a user who will review the email content. For this, we need to grab that user's ID in your stack. To do this, you first need to generate the authtoken. Follow the steps to log in to your Contentstack account (using the APIs) and generate the authtoken.
Note: When you make the call, ensure that you have removed "tfa_token": "{{your_2FA_token}}" from the body. This is not mandatory while making the call.
By using the generated authtoken, you need to make a call to fetch the list of users in your stack. In the response, you'll notice the collaborator array which will have the list of users in the stack as shown below:
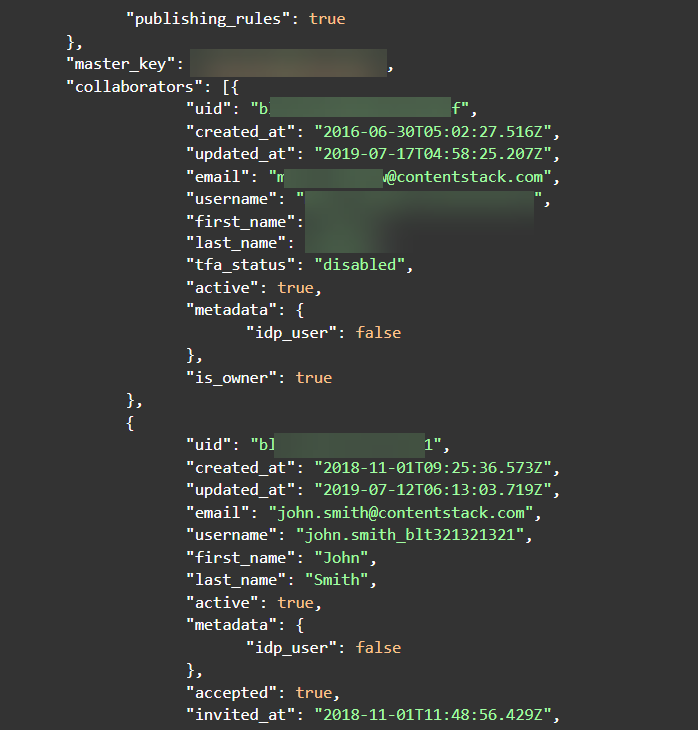
You can choose the user ID who will review the email and template. This user ID will be added in the lambda function. So make note of this.
Create Lambda Functions and API Gateways
For this example, we will require two lambda functions:
-
The first function will help us deliver the content to SendGrid and change the workflow stage to Review.
-
The second lambda function will help us complete the process by changing the workflow stage to complete.
Set up the First Lambda Function
To do this, follow the steps given below:
-
Log in to your AWS Management Console, select Lambda from the Services list.
-
Click on the Create function button, and then the Author from Scratch option.
-
Provide a name to your lambda function inside the Function name field, select Node.js 14.x as your Runtime language, and click on the Create function button.
-
You will get a success message on creation of the lambda function. From the downloaded code, inside the lambda-functions folder, there are two folders: create-template-function (for our first lambda function) and stage-update-function (for our second lambda function).
After cloning/downloading the repo, open the command prompt (or any code editor integrated terminal) and perform the following steps:
-
Move inside the 'create-template-function' folder (which you downloaded) and install the required dependency by using the following command:
npm install
-
Now, run the following command to create a zip file:
npm run build
After performing the npm run build command, you'll see the create-template-function.zip file in your create-template-function directory.
This is the zipped file that we will use in our lambda function.
- Now in the Code source section, click on the Upload from dropdown and select .zip file.
-
In the Upload a .zip file modal, click on the Upload button, and select the zipped file that you just created. Then, click on Save.
-
In the Runtime settings option, keep Handler as index.handler.
- Scroll up and select the Configuration tab.
- Click on the Environment Variable option on the left and add the following variables inside it by clicking on Edit and then Add environment variable. Once added, click on Save.
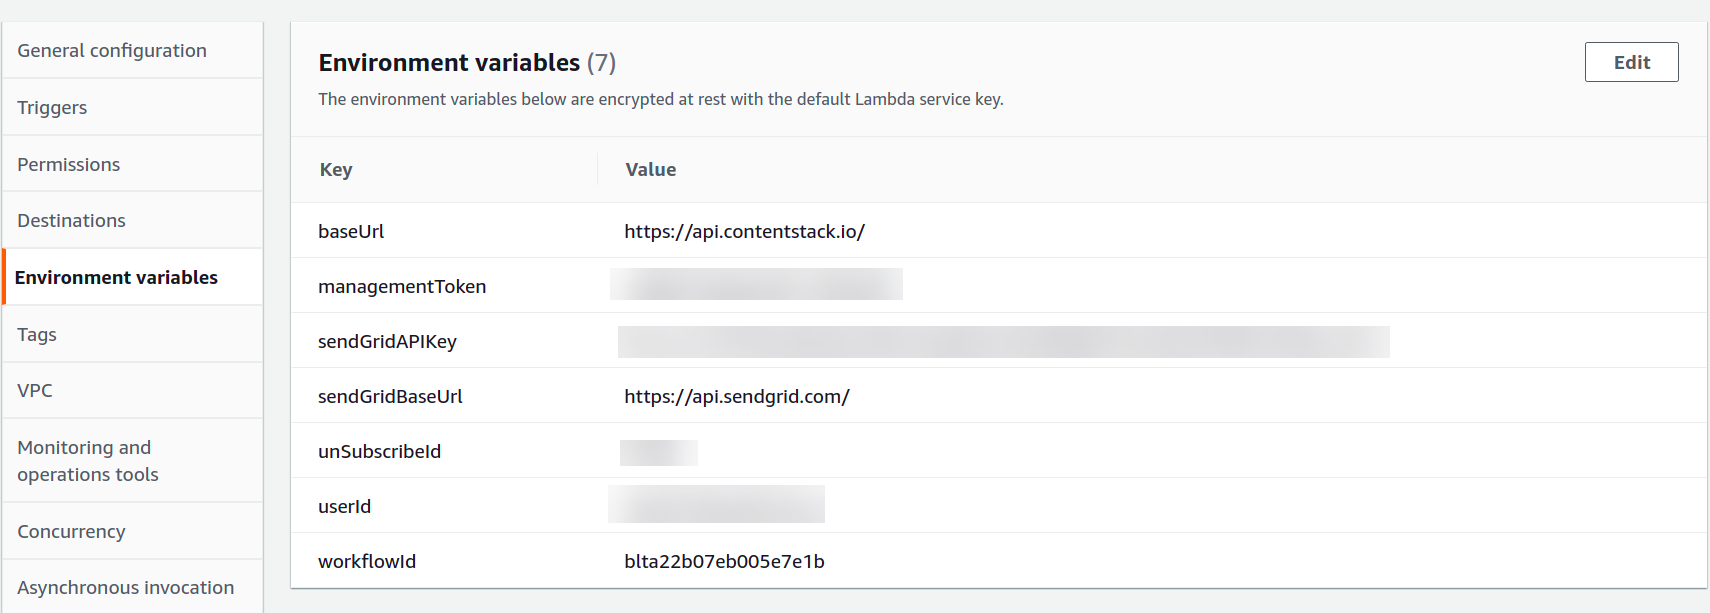
baseUrl: https://api.contentstack.io (North America);
https://eu-api.contentstack.com (Europe);
https://azure-na-api.contentstack.com(Azure NA)
managementToken: <<Your stack management token>>
sendGridAPIKey: <<SendGrid API Key generated in the first step>>
sendGridBaseUrl: https://api.sendgrid.com/workflowId: <<UID of the Workflow that we generated earlier>>
unSubscribeId: <<Unsubscribe group ID we created in the first step>>
userId: <<UID of the user who will review the email content, generated above>> - Your lambda function is now ready. Scroll up to the Function overview section and click on + Add trigger.
-
On the Add trigger screen, from the Select a trigger dropdown, select API Gateway.
-
From the API dropdown, select Create an API. Then, select REST API in the API type block, select Open from the Security dropdown, and click on Add.
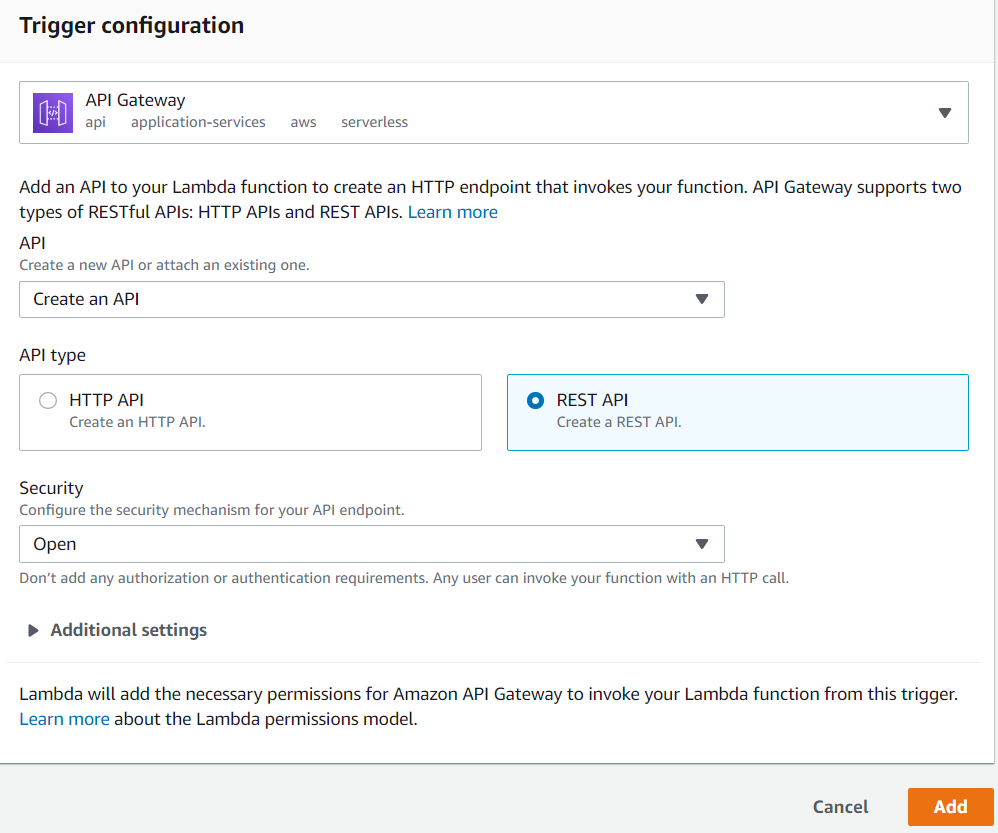
- An API for your lambda function is now created. Inside the Triggers section, you will see the Details link. Click on it and you will find your API endpoint. Make a note of it as we will need it while setting up our webhook in Contentstack.
Let's move ahead and create our second lambda function.
Set up the Second Lambda Function
Follow the same steps as mentioned above and create your second lambda function. The code for this function is inside the stage-update-function file (downloaded earlier). Follow the same steps to install the required dependencies by moving inside this folder in your command prompt and then build the zipped file as discussed above.
Then, upload the created zipped file to your second lambda function and add the following environment variables to this function:

apiKey: <<Your stack API Key>>
baseUrl: https://api.contentstack.io/ (North America)
https://eu-api.contentstack.com/ (Europe)
https://azure-na-api.contentstack.com/ (Azure NA)
contentTypeUid: <<UID of the content type imported in Step 4. In our case, it is sendgrid>>
managementToken: <<Your stack management token>>
workflowId: <<UID of the workflow we generated earlier>>
After creating the lambda function, follow the same steps and create an API trigger for this function as well. Make note of this API endpoint, we will need it while setting up a webhook in Sendgrid in the next step.
Create a Webhook in SendGrid
Go to you SendGrid dashboard and follow the steps given below:
-
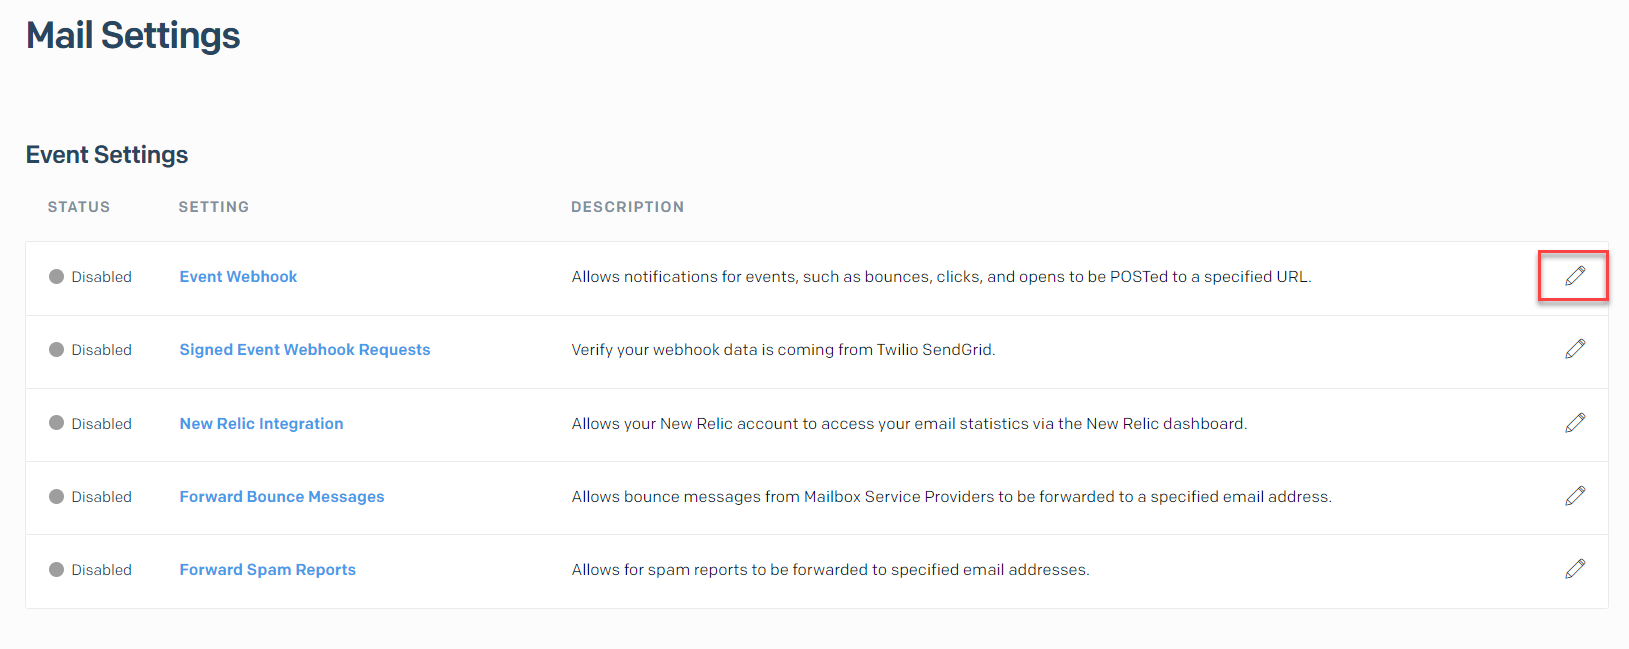
Navigate to Settings on the left navigation panel and click on Mail Settings.
-
On the Mail Settings page, under Event Settings, edit the Event Webhook option by clicking on the pencil icon as shown below:
-
On the Event Webhook page, keep the following settings:
- Authorization Method: None
-
HTTP Post URL: The API endpoint of the second lambda function we generated in the above step.
-
DELIVERABILITY DATA: Check the Delivered option.
-
Event Webhook Status: Keep this to ENABLED.
-
Click on the Save button to save your Event Webhook settings.
The SendGrid webhook will notify the second lambda function when the email is delivered. Upon receiving the trigger, the lambda function will update the workflow stage in our entry to Email Campaign Sent to indicate the completion of the process flow.
Let's now move ahead and create a webhook in Contenstack.
Set up Webhook in Contentstack
To let SendGrid send emails to your recipients, you need to set up a webhook. So, go to your stack, and follow the steps given below:
-
Click the “Settings” icon on the left navigation panel, and select Webhooks (or click “alt + W” for Windows, and “option + W” for Mac).
- Click on + New Webhook.
-
On the Create Webhook page, provide a suitable name and in the URL to notify field, enter the URL of the API gateway of the first lambda function.
-
Scroll down to the When section for creating a trigger for the webhook as shown below:

- Ensure to check the Enable Webhook option and click on the Save button to save your settings.
With these steps, we have completed the entire set up and now we are ready to try it out.
Try Out the Steps
Now to test whether the setup is working fine, follow the steps given below:
-
Open the SendGrid content type and create an entry inside it.
-
Add the details in the fields and publish the entry on the environment that you have provided while setting up the webhook. In our example, we have published the entry on the “development” environment.
-
Upon publishing, the webhook will trigger the first lambda function which will upload the email content on SendGrid and change the workflow stage to Review Email Template.
- The user assigned to review the email will receive an email along with the link as shown below:
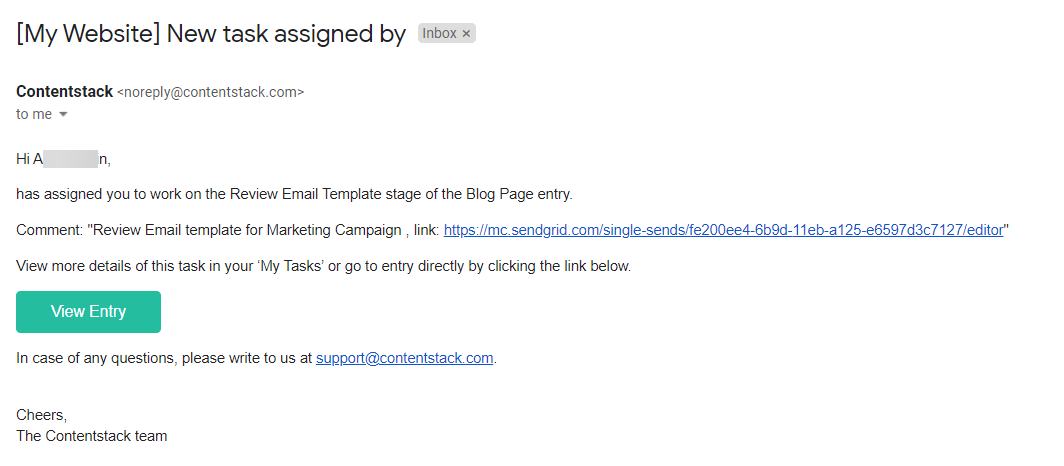
- The reviewer when clicks on the link will be redirected to the SendGrid page where he/she can review the content.
-
Review the content and once you are sure, click on the Review Details and Send button on the top right corner.
-
On the Single Send Details page, verify the details once again, and click on Send.
-
You will be redirected to the Single Sends page where you can see you email scheduled for the delivery as shown below:
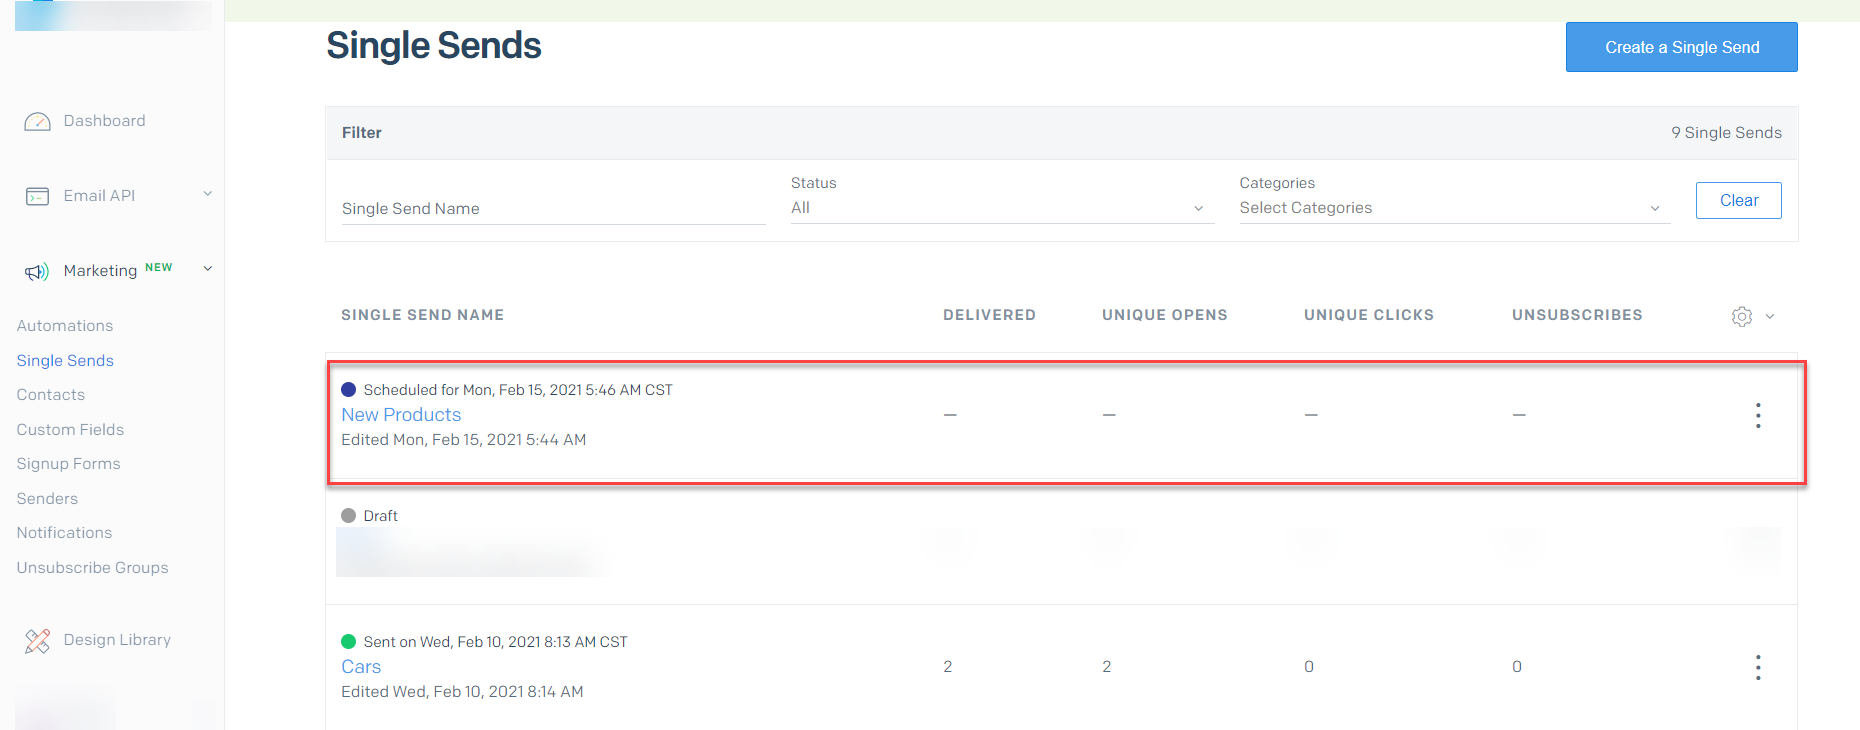
- It takes a few minutes for your email to deliver to your recipients. Once it's delivered, the status changes to Sent in green. You will also see the number of recipients in the DELIVERED column (in our case, 2) as shown below:

-
Your email is sent. Upon this, the Sendgrid webhook that we set will invoke the second lambda function. This will cause the workflow stage of our entry to change to "Email Campaign Sent".
Note: If you want to make any changes in the current email content (edit it while reviewing in SendGrid), you can do so in the entry and publish it again in Contentstack. Ensure that the content in the Single send Id field is not deleted when you publish the entry.


