Since you can create roles with various permissions, we have listed down examples of some common scenarios.
Entry-level Permissions
Scenario 1:
Create a role that has all permissions to all entries of specific content types.
Example:
All permissions to the “Products” content type
To do this, log in to your Contentstack account and perform the following steps:
- Click on the Organization dropdown on the header and select the organization where you want to make the changes.
- Select the Stack where you want to provide the permissions.
- Click the “Settings” icon on the left navigation panel, and select Users & Roles.
- Click on Roles.
- Click + New Role and add relevant Name and Description.
- Under Entries in the Permissions section, go to All Entries of Content Types and click + Add rule.
- Select All Permissions in the Select Permissions field.
- In the next field, click and select Specific Content Types.
- Click the Select Content Types button that appears, and select the content types (e.g., Contact Us) to which you want to assign the permissions.

- Then, click Add Content Types. Save the role.
Scenario 2:
Create a role that has specific permissions to all entries of specific content types.
Example:
READ permission to the “Contact Us” content type
To do this, log in to your Contentstack account, and perform the following steps:
- Click on the Organization dropdown on the header and select the organization where you want to make the changes.
- Select the Stack where you want to provide the Read permission.
- Click the “Settings” icon on the left navigation panel, and select Users & Roles.
- Click on Roles.
- Click + New Role and add relevant Name and Description.
- Under Entries in the Permissions section, go to All Entries of Content Types and click + Add rule.
- Select the READ permission in the Select Permissions field.
- In the next field, click and select Specific Content Types.
- Click the Select Content Types button that appears and select the content types (e.g., Products) to which you want to assign the permissions

- Click Add Content Types. Save the role.
Scenario 3:
Create a role that has all permissions to all entries of all content types. But the role CANNOT read a specific entry of a content type.
Example:
CANNOT READ the “Introducing iPhone X” entry of the Products content type.
To do this, log in to your Contentstack account, and perform the following steps:
- Click on the Organization dropdown on the header and select the organization where you want to make the changes.
- Select the Stack where you want to provide the permissions.
- Click the “Settings” icon on the left navigation panel, and select Users & Roles.
- Click on Roles.
- Click + New Role and add relevant Name and Description.
- Under Entries in the Permissions section, go to All Entries of Content Types and click + Add rule.
- Select All Permissions in the Select Permissions field.
- In the next field, select All Content Types.
- Scroll down and click the + Add exceptions link.
- Under Specific Entries, click + Add rule.
- Under Permissions, select Read (you will see that All Permissions will be selected by default). Then, click Select Content Type, and select a content type (e.g., Products). And finally, select the entry to which you want to restrict read access (e.g., Introducing iPhone X).
- Click Add Entries. Save the role.
Field-level permissions
Scenario 4:
Create a role that has all permissions to all entries of all content types. But the role CANNOT edit a specific field of a content type.
Example:
CANNOT EDIT the Description field of the Products content type.
- Click on the Organization dropdown on the header and select the organization where you want to make the changes.
- Select the relevant Stack.
- Click on the “Settings” icon on the left navigation panel, and select Users & Roles.
- Click on Roles.
- Click + New Role and add relevant Name and Description.
- Under Entries in the Permissions section, go to All Entries of Content Types and click + Add rule.
- Select All Permissions in the Select Permissions field.
- In the next field, select All Content Types.
- Scroll down and click the + Add exceptions link. Under Specific Fields, click + Add rule.
- Under Permissions, select Edit. Then, click Select Content Type, and select a content type (e.g., Products). And finally, select the field to which you want to restrict edit access (e.g., Description).
- Click Add Entries. Save the role.
Asset-level permissions
Scenario 5:
Create a role that has specific permissions on specific assets.
Example:
READ only ‘Image 1’ and ‘Image 2’.
- Click on the Organization dropdown on the header and select the organization where you want to make the changes.
- Select the relevant Stack.
- Click on the “Settings” icon on the left navigation panel, and select Users & Roles.
- Click on Roles.
- Click + New Role and add relevant Name and Description.
- Under Assets in the Permissions section, click + Add rule.
- Select the required permissions (e.g., Read) in the Select Permissions field.
- In the next field, select Specific Assets. Then, click the Select Assets button that appears. You can then select the assets (e.g., Image 1 and Image 2) to which you want to assign the selected permissions.
- Save the role.
Language-level permissions
Scenario 6:
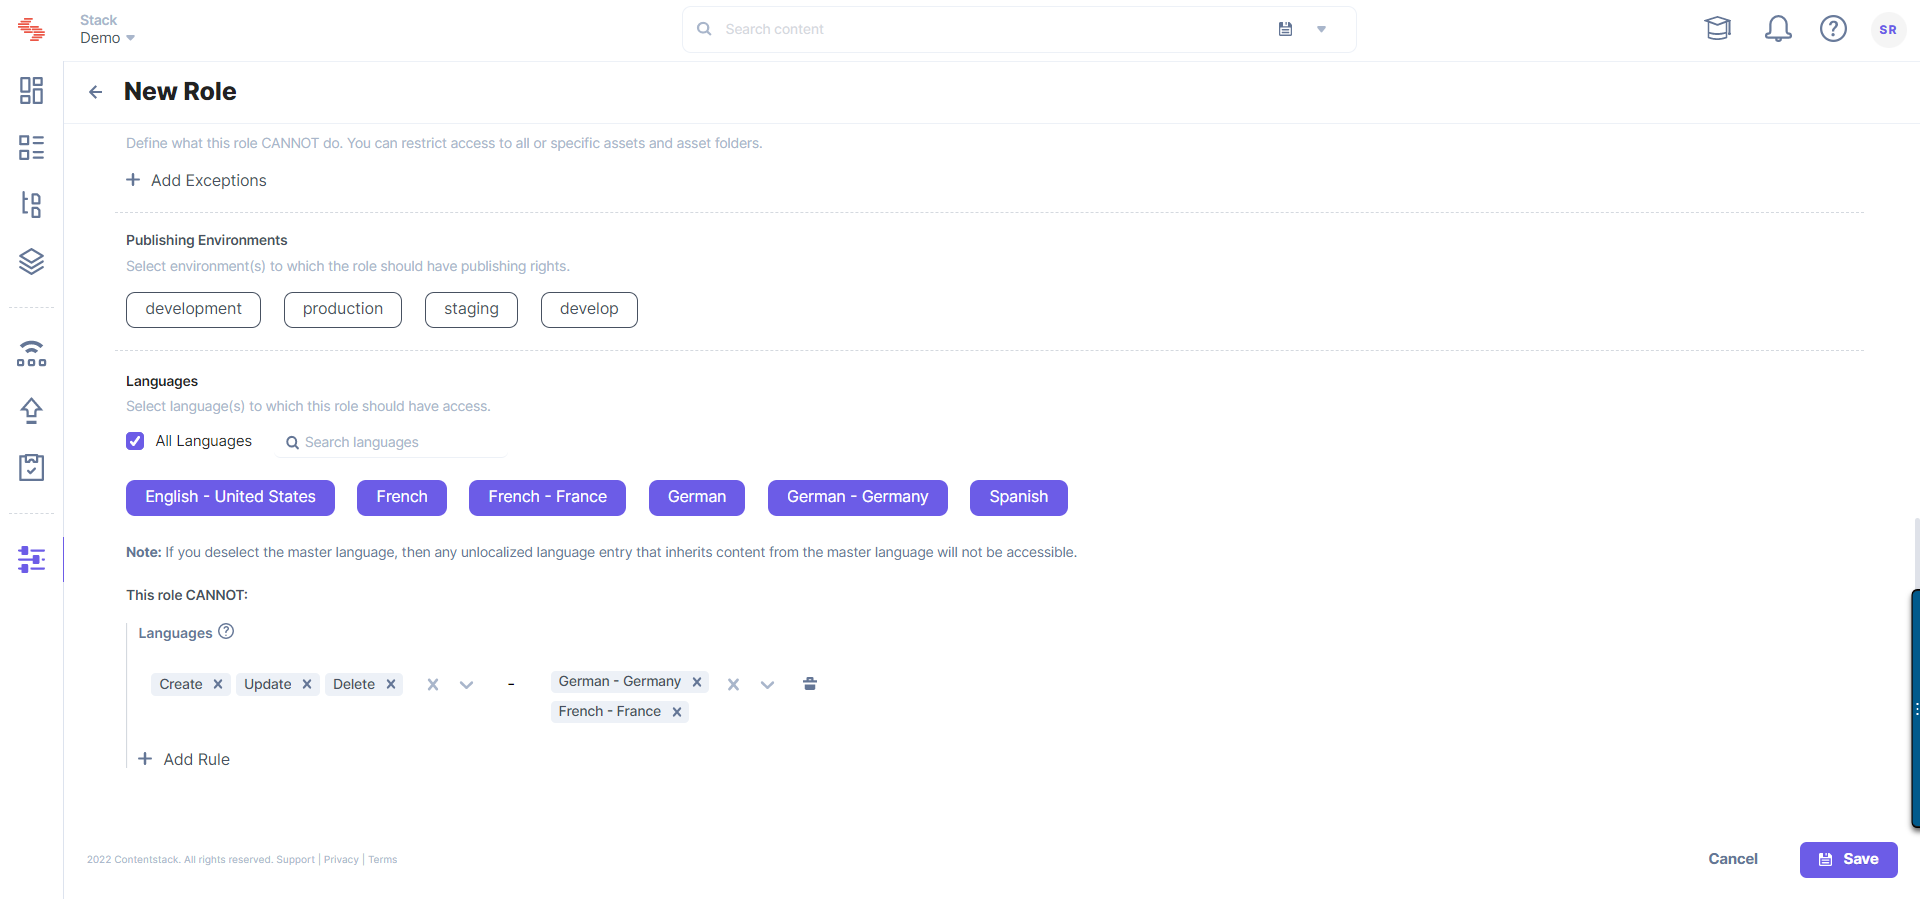
Create a role that has all permissions to all language variants of entries of the stack. However, the role CANNOT create, update or delete entries localized in specific language variants.
Example:
CANNOT CREATE, UPDATE, or DELETE entries localized in the French (France) and German (Germany) languages of the stack.
To do this, log in to your Contentstack account and perform the following steps:
- Click on the Organization dropdown on the header and select the organization where you want to make the changes.
- Select the relevant Stack.
- Click on the “Settings” icon on the left navigation panel, and select Users & Roles.
- Click on Roles.
- Click + New Role and add relevant Name and Description.
- Under Languages in the Permissions section, select the All Languages checkbox to provide access to all the available languages.
- To add a language-specific exception, click + Add Exceptions.
- Click + Add Rule and select the required permissions (e.g., Create, Update or Delete) in the Select Permissions field.
- In the next field, select specific languages, e.g., French - France and German - Germany.

- Save the role.
Scenario 7:
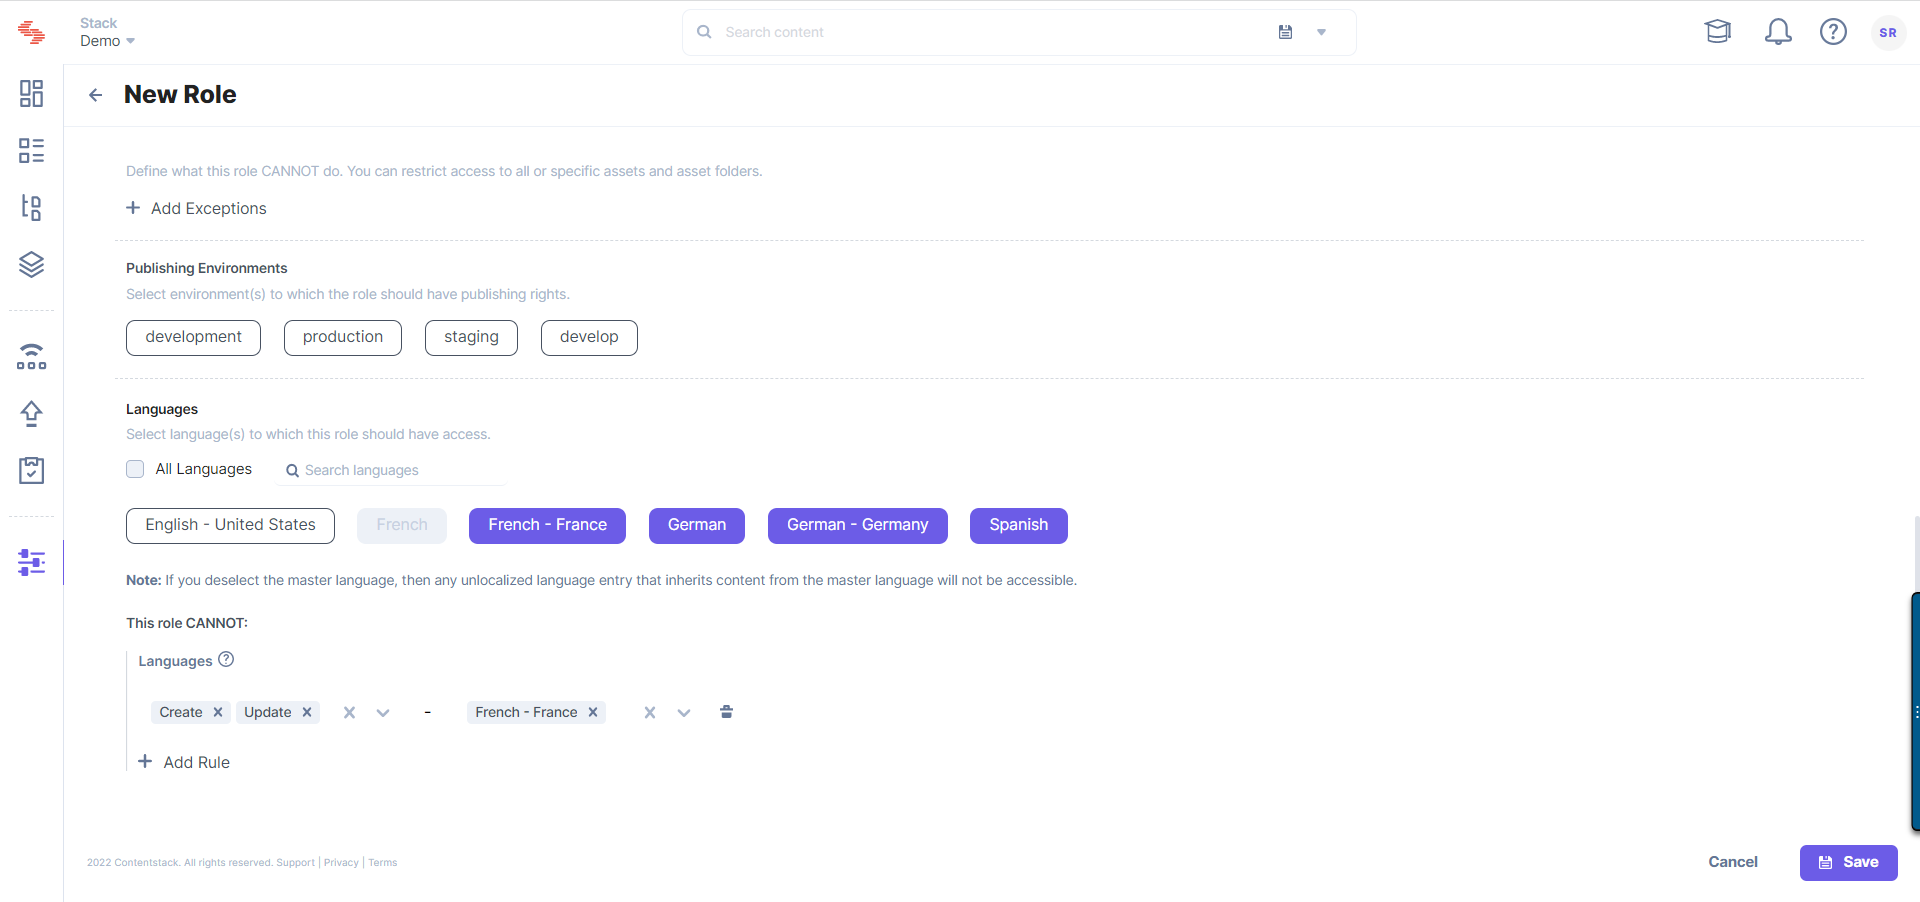
Create a role that has all permissions to all language variants of entries of the stack except the master language. The role CANNOT create, update or delete entries localized in the master language variant.
Warning: If you deselect the master language, then any unlocalized language entry that inherits content from the master language will not be accessible.
Example:
CANNOT CREATE, UPDATE, or DELETE entries localized in the English (United States) language of the stack.
To do this, log in to your Contentstack account and perform the following steps:
- Click on the Organization dropdown on the header and select the organization where you want to make the changes.
- Select the relevant Stack.
- Click on the “Settings” icon on the left navigation panel, and select Users & Roles.
- Click on Roles.
- Click + New Role and add relevant Name and Description.
- Under Languages in the Permissions section, deselect the English - United States language to disallow access to it.
- To add a language-specific exception, click + Add Exceptions.
- Click + Add Rule and select the required permissions (e.g., Create, Update or Delete) in the Select Permissions field.
- In the next field, select one or more of the available language, e.g., French - France.

- Save the role.
Api Reference
Here are some relevant API requests that you can use when working with our Content Management APIs:


