Now that you have read through the workflow document, let’s see workflows in action with the help of some real-world use cases. In this section, we will look at a couple of scenarios (requirements) and learn how to achieve them using workflows in Contentstack.
Given below is a content creation and publishing process of a typical media company. Let’s look at what the process is and then we will go about creating a corresponding workflow in Contentstack.
Requirements to implement a workflow
- The content writer creates the first draft of an article.
- When she feels it is ready, she sends it to a reviewer for content review.
- The reviewer reviews the content and either tells the content writer it needs more edits or it’s ‘good to go’.
- Once the entry is good to go, it goes to the SEO team, where the SEO tags are added.
- The SEO team says the content is ready for publishing and sends it back to the content writer.
- The content writer can then publish the entry.
Conditions to publish content
- Content writers can send an entry for review to the reviewer. But they cannot send it directly to the SEO team for SEO tagging, nor mark it as ready for publishing.
- The reviewer can send the entry back to content writers for changes, or send it to the SEO team. But the reviewer cannot mark the entry as ready for publishing.
- Content cannot be published until the SEO team signs off and marks it as ready for publishing.
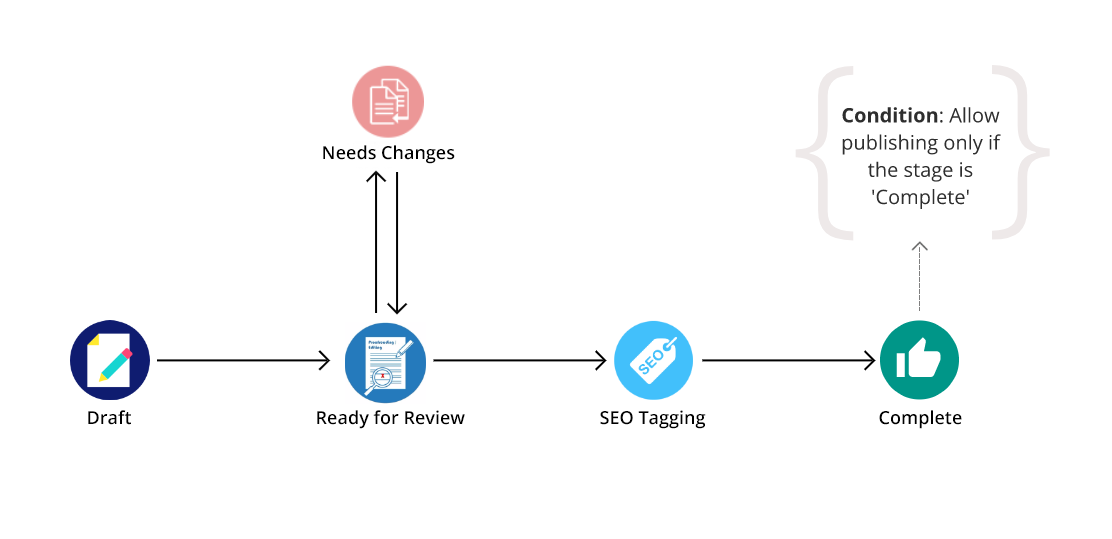
Let’s put the above scenario in a flowchart:

For this scenario, we will first define the workflow. And then we will add publish rules to apply the conditions.
Add a workflow to define process
Carry out the following steps:
- Log in to your Contentstack account and select the relevant stack.
- Click the “Settings” icon on the left navigation panel and select Workflows.
- You will see a screen that has 2 options: Workflows and Publish Rule. By default, Workflows is selected. Click on + New Workflow.
- In the page that opens, enter the workflow name and description.
- In the Scope field, select content types for which you want to apply this workflow.
We will create all the required stages first, then we will apply stage transition rules.
“Draft” stage for first draft
- Click on + to add Workflow Stages.
- In the Name text box, enter Draft and in Description, enter This is the first draft stage.
- The color label is blue by default. This can be changed. But leave it as is for now.
“Ready for Review” stage for editor’s review
- Click on + to add Workflow Stages.
- In the Name text box, enter Ready for Review and in Description, enter This is the review stage.
- Change the default label color to any color of your choice, but it should be unique.
“Needs Changes” stage if changes are required
- Click on + to add Workflow Stages.
- In the Name text box, enter Needs Changes and in Description, enter This is the second draft stage.
- Change the default label color to any color of your choice, but it should be unique.
“SEO Tagging” stage for the SEO team
- Click on + to add Workflow Stages.
- In the Name text box, enter SEO Tagging and in Description, enter This is the SEO tagging stage.
- Change the default label color to any color of your choice, but it should be unique.
“Complete” stage to mark the entry as ready for publishing
- Click on + to add Workflow Stages.
- In the Name text box, enter Complete and in Description, enter This is the complete stage.
- Change the default label color to any color of your choice, but it should be unique.
Add stage transition rules to move content through stages
We will now add the stage transition rules as follows:
Edit the Draft stage
- Click on the “Edit” icon of the Draft stage and click on Stage transition rules.
- In the Next available stages option, select Specific stages and enter Ready for Review in the textbox.
- Then, select Specific users/roles and inside Roles, select Content Writer as shown below:
- Click on Done.
Edit the Review stage
- Click on the “Edit” icon of the Ready for Review stage and click on Stage transition rules.
- In the Next available stages option, select Specific stages and enter Draft, Needs Changes and SEO Tagging in the textbox.
- Select Specific users/roles and inside Roles, select Reviewer as shown below:
- Click on Done.
Edit the Needs Changes Stage
- Click on the “Edit” icon of the Needs Changes stage and click on Stage transition rules.
- In the Next available stages option, select Specific stages and enter Ready for Review in the textbox.
- Select Specific users/roles and inside Roles, select Content Writer as shown below:
- Click on Done.
Edit the SEO Tagging Stage
- Click on the “Edit” icon of the SEO Tagging stage and click on Stage transition rules.
- In the Next available stages option, select Specific stages and enter Complete in the textbox.
- Select Specific users/roles and inside Roles, select SEO Team as shown below:
- Click on Done.
Edit the Complete Stage
- Click on the “Edit” icon of the Complete stage and click on Stage transition rules.
- In the Next available stages option, select All stages.
- Select All users/roles as shown below:
- Click on Done.
- Select the Enable Workflow Stages checkbox and click on Save.
Add publish rules to publish content
We need to create a rule that allows publishing on the production environment only if the workflow stage is Complete.
- In your stack, click the “Settings” icon on the left navigation panel, and then Workflows.
- Click on the Publish Rules tab.
- Click the + New Rule button.
- Under Parameters, first select the content types for which you want to apply this rule. Then, select Language (English - United States), Action (Publish) and Environment (Production).
- Under Conditions, skip Approvers and go to Workflow stage should be:. Click the field and select Complete.
- Save the rule.
With this, you are done with adding a workflow (and the required publish rule) for the given scenario.
Let’s look at another use case. In this case, we will look at we will learn how to add more publish rules in order to get granular control over the publishing process.
Requirements to add publish rules
- A content writer creates the first draft of an article.
- He then sends the entry to a proofreader.
- The proofreader proofreads the entry and sends it to an Illustrator for adding relevant images.
- The illustrator adds image(s) and marks the entry as complete, and sends it to John Smith for approval.
Conditions
- An entry cannot be published unless it is approved by John Smith.
- An entry cannot be published unless the Complete stage is reached.
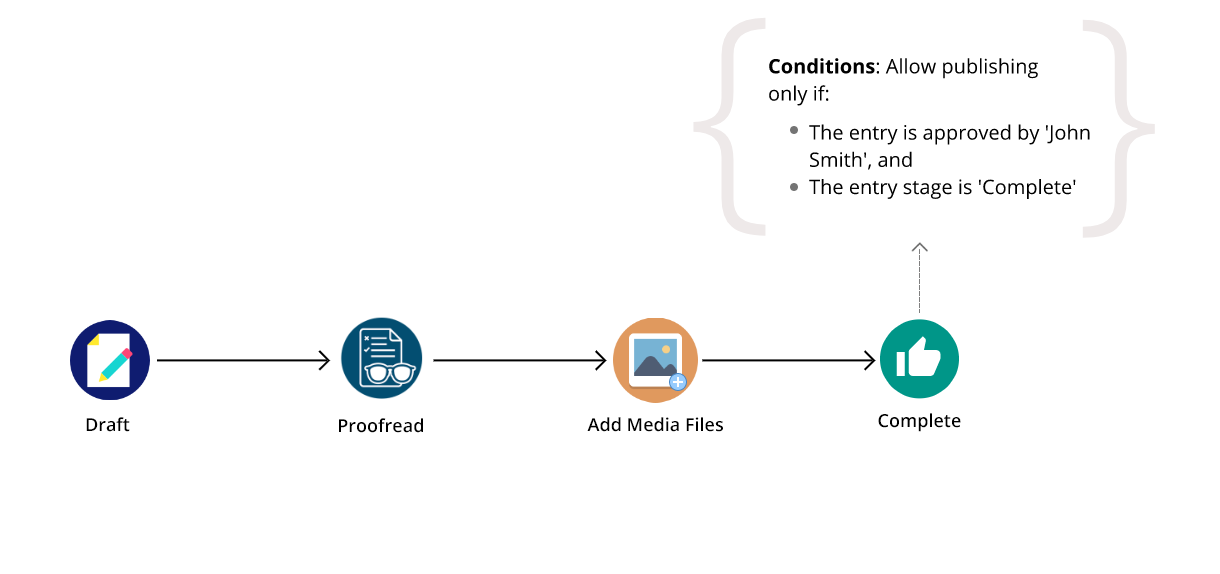
Let’s put this in a flowchart:

Let’s first define the workflow. Then, we will add publish rules to apply the conditions.
Add the workflow
Follow the steps:
- Log in to your Contentstack account and select the relevant stack.
- Click the “Settings” icon on the left navigation panel and select Workflows.
- Click on + New Workflow.
- In the page that opens, enter a relevant name and description for the workflow.
- In the Scope field, add content types to which you want to apply this workflow.
We will now add all the required stages first.
“Draft” stage for the first draft
- Click on + to add Workflow Stages.
- In the Name text box, enter Draft and in Description, enter This is the first draft stage.
- The color label is blue by default. This can be changed. But leave it as is for now.
“Proofread” stage for proofreading the entry
- Click on + to add Workflow Stages.
- In the Name text box, enter Proofread and in Description, enter This is the proofread stage.
- Change the default label color to any color of your choice, but it should be unique.
“Add Media Files” for adding images
- Click on + to add Workflow Stages.
- In the Name text box, enter Add Media Files and in Description, enter This is where you will add the required media files for the entry.
- Change the default label color to any color of your choice, but it should be unique.
“Complete” stage
- Click on + to add Workflow Stages.
- In the Name text box, enter Complete and in Description, enter This is the complete stage.
- Change the default label color to any color of your choice, but it should be unique.
Add the stage transition rules
We will now add the stage transition rules as follows:
Edit the Draft stage
- Click on the Edit icon of the Draft stage and click on Stage transition rules.
- In the Next available stages option, select Specific stages and select Proofread.
- Then, select Specific users/roles and inside Roles, select Content Writer as shown below:
- Click on Done.
Edit the Proofread stage
- Click on the Edit icon of the Proofread stage and click on Stage transition rules.
- In the Next available stages option, select Specific stages and select Add Media Files.
- Select Specific users/roles and inside Roles, select Proofreader as shown below:
- Click on Done.
Edit the Add Media Files Stage
- Click on the Edit icon of the Add Media Files stage and click on Stage transition rules.
- In the Next available stages option, select Specific stages and select Complete in the textbox.
- Select Specific users/roles and inside Roles, select Illustrator as shown below:
- Click on Done.
Edit the Complete Stage
- Click on the Edit icon of the Complete stage and click on Stage transition rules.
- In the Next available stages option, select All stages.
- Select All users/roles as shown below:
- Click on Done.
- Select the Enable Workflow Stages checkbox and click on Save.
With this, we have added the workflow stages and defined the stage transition rues. Let’s now add publish rules.
Add publish rules
- Now, we need to define rules that allow publishing only if the stage is ‘Complete’, and if the entry is approved by John Smith.
- Go to the stack, and click the “Settings” icon, and select Workflows.
- You will see a screen that has 2 options: Workflows and Publish Rule. By default, Workflows is selected. Click on Publish Rules as shown below:
- Click on + ADD RULE. In the screen that opens, you will see broad sections: Parameters and Conditions.
- Under Parameters, first select the content types for which you want to apply this rule. Then, select Language (English - United States), Action (Publish) and Environment (Production).
- Under Conditions, in Approver(s), select John Smith in Users.
- In Workflow Stage, select Complete.
- Click on Save.
With this, you have created a workflow that satisfies the given scenario.
![]()


![]()